

How To Make Curved Concrete Forms
Tips to Build a Concrete Walkway
Avert hassles now and cracks later
Build strong, fissure-free concrete sidewalks and slabs with these 10 pro tips. Tips include forming edges, leveling, smoothing, curing and other vital steps in creating a kickoff-rate concrete pour. Also, the x virtually common mistakes.
Yous might also like: TBD
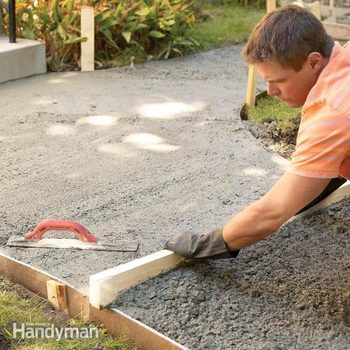
Concrete Walkway Molds Tip 1: Overbuild your forms

Diagonal "kicker" plus stake
The angled 2×4 reinforces the side stake that holds the form vertical.
Every builder has a horror story about forms that bulged or even complanate under the force of moisture concrete. To avoid a horror story of your ain, build strong forms. Use 1-i/2-in.-thick boards (2x4s, 2x6s, etc.) except on curves. If yous're using 2x4s or 2x6s, place stakes no more than than 3 ft. apart. If the forms extend below ground, pack soil against them. If they extend more than than half dozen in. aboveground, reduce the spacing between stakes and brace each one with a second stake and a diagonal "kicker."
Tip 2: Form curves with hardboard

Create smooth curves
Hardboard is cheap form fabric and is easy to flex into polish curves.
Hardboard siding is intended for outside walls, but information technology's also bang-up stuff for forming curves because it'due south flexible and cheap. A 12-in. 10 16-ft. plank costs near $10 at lumberyards and you tin can cut information technology to whatsoever width y'all need. Considering it's and then flexible, hardboard needs extra reinforcement to prevent bulging against the strength of the concrete. If the forms are belowground, place stakes no more than 3 ft. apart and pack soil confronting them. For aboveground forms, infinite stakes sixteen in. autonomously. To form consistent, parallel sides for a curved sidewalk, build one side first. Then use a "gauge board"—a 1×4 with blocks screwed to it—to position the other side. In wet weather, hardboard tin can nifty and your perfect curves might become wavy. And so if rain is forecast, exist prepared to cover your hardboard forms.
Tip iii: Keep stakes below the form tops

Screed without obstructions
Bulldoze or cut off stakes below the class top to make screeding easier.
Stakes that projection to a higher place forms create a hurdle for your screed board—and screeding concrete is hard plenty without obstacles. So before you cascade, have five minutes to cut off any protruding stakes. If the tops of your forms are virtually basis level, make sure your screed board won't elevate against the ground; yous may have to skim off a piffling dirt to clear a path for the board.
Top x Concrete Walkway Molds Mistakes
1. Ordering just enough. If y'all're ordering physical, information technology's much improve to pay $60 for an extra half 1000 of concrete than to come up brusque. You don't have to use information technology all. The driver volition haul away the leftovers.
two. Ignoring the forecast. A little rain can destroy a freshly poured slab. Beware of hot, dry out weather also. The concrete may gear up faster than you tin can end information technology, particularly if y'all're a beginner.
3. Working solo. Line up more assistance than y'all think you'll need. Extra assist not only lightens the workload simply avoids situations where the concrete hardens faster than you can work.
4. Not existence gear up. A big concrete pour is a rush task. Don't add together stress by waiting until the last minute to terminate forms or gather tools. Accept everything washed and all your tools handy long before the truck pulls upwards.
5. Using wimpy wheelbarrows. A heavy load of concrete can beat out a garden wheelbarrow. Utilise heavy-duty models only, even if you lot accept to hire them ($15 per day).
6. Relying on fiber. The tiny fibers added to some concrete mixes may reduce surface groovy, but cobweb is no substitute for metal rebar or wire mesh.
7. Finishing with actress water. It'southward tempting to sprinkle a little water on the surface while you're troweling to aid you become a shine finish. But it weakens the surface and will lead to flaking subsequently.
8. Getting burned. Some people can tolerate hours of skin contact with concrete. Others end up in the emergency room with severe burns. Don't take a chance it: Wear gloves and long pants, and launder concrete off skin immediately.
ix. Vehement off forms also before long. It's easy to break off concrete edges while removing forms. So allow the concrete harden for at least two days outset.
10. Forgetting your autograph. Be sure to scratch your initials in the concrete before it hardens.
Tip 4: Put down a solid base

Pack the base
A plate compactor is a heavy vibrating machine that solidly packs a soil or gravel base.
A house, well-drained base is the cardinal to crevice-free concrete. The best plan for a solid base usually includes compacted soil followed past several inches of a base textile such every bit gravel. Merely the best base depends on climate and soil weather. And so talk to a local building inspector who'due south familiar with conditions in your neighborhood. Packing the soil with a rented plate compactor is ever a adept thought, but you lot may be able to skip the gravel altogether if you take sandy soil.
Video: How to Pour a Physical Slab
Tip five: Plunge out the bubbles

Pack the concrete
Packing the physical forces out air bubbles and voids that weaken a slab.
When you pour concrete, air pockets get trapped against forms, leaving voids in vertical surfaces. That usually doesn't matter on sidewalks or driveways. But aboveground, on stairs, curbs or walls, the results tin can look like Swiss cheese. To preclude that, just grab a 2×4 and "plunge" all along the forms. So go all along the forms with a hammer, tapping the sides.
Tip 6: Avert also much water
When you have concrete delivered, the first words out of the driver's mouth may be "Should I add some h2o?" Unless the concrete is too dry to flow down the chute, your answer should be "No, thanks." The right amount of h2o is advisedly measured at the plant. Extra h2o weakens the mix. More than water makes it easier to work with right abroad, but will atomic number 82 to a weaker slab.
If you're mixing your own concrete, practice this test: Plow a groove in a mound of physical with a shovel or hoe. The groove should be fairly smooth and hold its shape. If it's rough and chunky, add a smidgen of h2o. If it caves in, add more dry physical.
Tip vii: Don't delay floating

Bull bladder in action
Use a bull float to flatten large areas immediately after placing the concrete.

Shut-upwards of mag bladder
Employ a magnesium or wooden float to flatten smaller areas.
After screeding concrete, the side by side pace is to "float" it. Floating forces the stones in the mix down and pulls the cement "cream" to the surface and so you can trowel or broom the surface later without snagging chunks of gravel. If you wait likewise long and the concrete begins to stiffen, cartoon the cream up is difficult or impossible. So the time to float is right after screeding. On a long sidewalk or driveway, information technology'southward best to have a helper who can commencement floating fifty-fifty before all the screeding is done. There is one reason to delay floating, though: If puddles of water form on the surface after screeding, wait for them to disappear before floating.
On small projects, y'all tin use a hand float made from forest or magnesium (both at home centers). The "mag" bladder glides easier for less arm strain. But for bigger projects similar driveways or patios, don't mess effectually with a hand float. Instead, rent a bull float. The long handle extends your accomplish and makes the chore easier, while the broad caput covers the surface quickly and flattens out whatsoever bulges or depressions. To brand the surface as apartment equally possible, float it in both directions.
Recipe for a Lasting Concrete Driveway
As well many builders—pros and DIYers alike—treat a driveway only like a patio or sidewalk. But because they support vehicles, driveways deserve some extra effort and expense. Whether you're hiring a contractor or doing information technology yourself, hither are iii suggestions for a stronger slab:
Thickness: Most driveways are 4 in. thick, but consider a five-in. slab. That extra inch of physical increases the strength of the slab past near 50 percent but increases the toll of a typical driveway by only $200 to $300.
Reinforcement: There are two ways to reinforce a concrete driveway: with rods of rebar or with wire mesh. The purpose of reinforcement is to reduce smashing and to concur the slab together if it does fissure. Rebar does both jobs better and costs only a few bucks more than for a typical driveway.
Base of operations: What goes under your driveway is but as important as the driveway itself. The best base varies according to climate and soil conditions. It may exist a sixteen-in. layer of special base material or six in. of compacted gravel. To become advice, talk to a edifice inspector who'due south familiar with soil conditions in your surface area. If you're hiring a contractor to do the task, be certain the bids describe the base in detail. And don't choose a low bid that skimps on the base work.
Tip viii: Cutting deep control joints

Cutting a control joint
Mitt cut control joints with a special groover and straightedge while the concrete is still soft.

Close-up of groover
A groover has a blade (typically i-in.) on the underside that cuts the groove.
The grooves in physical are called "control joints" because they control groovy. Physical shrinks every bit it dries, so cracks accept to happen somewhere. Control joints create straight breaks rather than an ugly spiderweb design. They also limit cracks that course later. On a sidewalk, space joints 5 ft. apart or less; on a slab or driveway, no more than than 10 ft. apart.
There are two ways to make control joints: Turn them in the wet concrete correct afterwards floating or cut them the following twenty-four hours with a saw. Y'all can purchase a diamond bract for your round saw at dwelling house centers. Creating joints with a "groover" in wet concrete is less piece of work and less mess. Joints should be at least 1-4th the depth of the concrete. A groover that cuts ane-in.-deep grooves costs most $25. If you lot have an inexpensive version ($vii) that doesn't cut deep enough, use it to create the initial articulation, and so deepen the cut with a stiff putty knife.
Tip 9: Finish with a broom

Broom the cease
A stiff broom creates a slightly roughened physical surface.
A smooth, steel trowel finish is also slippery for outdoor concrete. Instead, elevate a broom over the physical. You'll get a nonslip texture and hide imperfections left by floating or troweling. You can use a apparently erstwhile push broom, merely a special concrete broom cuts finer lines. The sooner you start, the rougher the finish. Make your first pass well-nigh 15 minutes after floating. If the texture is besides rough, smoothen it over with a mag float and effort once more in 15 minutes. Drag the broom over the concrete in parallel, slightly overlapping strokes. You may have to rinse off the broom occasionally to avoid a too-crude stop.
Tip 10: Slow the curing

Encompass with plastic
Plastic sheeting keeps the wet in the concrete and aids curing.
Water is essential for the chemical procedure that makes physical harden—the longer physical stays damp, the harder and stronger it gets. One way to deadening down drying is to cover concrete with four-mil plastic sheeting. When concrete is hard enough and so you tin can't brand an impression with your finger, gently spread the plastic. Stretch it out to eliminate wrinkles and weigh down the edges to seal in moisture. When you see signs of drying, elevator the plastic and gently sprinkle on more water. Keep a sidewalk or patio clammy for iii days. Seven days is best for a driveway. Plastic can cause mottled coloring on concrete, but the splotches disappear in a month or two.
Pros often skip the plastic and spray on a waxy liquid "curing compound" to boring down evaporation. Though non as constructive as plastic, curing compounds are easy to apply with a garden sprayer. Curing compounds are available at home centers.
Required Tools for this Project
Take the necessary tools for this DIY project lined up before you commencement—y'all'll salve time and frustration.
You'll likewise need a shovel, leather gloves, plastic gloves, a plate compactor (rental), a bull bladder (rental), a mag bladder, a groover and a stiff push broom.
Required Materials for this Project
Avoid concluding-minute shopping trips by having all your materials prepare ahead of time. Here's a list.

Source: https://www.familyhandyman.com/project/tips-to-build-a-concrete-walkway/
Posted by: coatespashe1992.blogspot.com
0 Response to "How To Make Curved Concrete Forms"
Post a Comment